Azure Server Setup
ℹ️ Requires an Organization plan
Technical Requirements
- An Azure VM running Ubuntu Server 2024 (used in this guide)
- At least Azure VM Standard D2s v5 (2 vCPUs and 8 GiB RAM)
- Docker-engine version > 23.0.5 (Installation instructions in this guide)
- Docker-compose version > 2.18.0 (Installation instructions in this guide)
- 30 GB storage for the VM
- 80 GB additional disk storage for data (Instructions in this guide)
- Azure Blob Storage mounted with BlobFuse2 (Instructions in this guide)
- (Optional) A user identity management service such as Azure AD or LDAP for SSO authentication.
Other Requirements
Make sure your firewall supports HTTP2 connections. Anchorpoint uses the gRPC protocol to communicate with the server, which is based on HTTP2. It has a fallback for an HTTP1 gateway, however gRPC improves the speed and effiency of realtime updates to the Anchorpoint client. We highly recommend that you start an Anchorpoint cloud trial to evaluate whether gRPC works in your environment.
Licensing
Licensing depends on the number of users you will have. Please contact us for a quote. You can also request a free trial license to test the self hosted environment. You will receive a license key that you will need to enter during the installation process.
ℹ️ Using a reverse proxy or load balancer? If you plan to deploy the Anchorpoint stack behind a reverse proxy or load balancer that handles SSL termination, please refer to our Reverse Proxy Setup Guide for detailed configuration instructions.
VM Setup
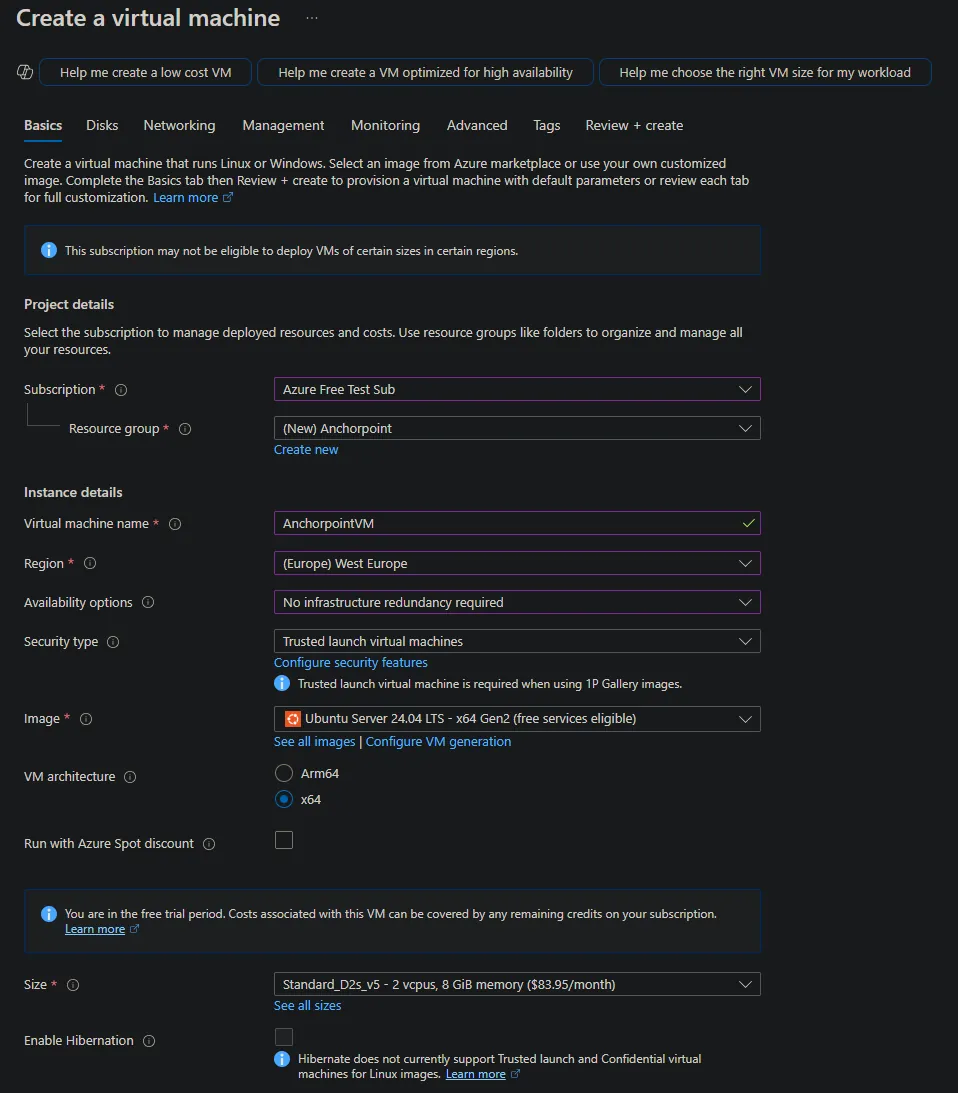
In your Azure Portal navigate to "Virtual Machines" and click "Create a virtual machine".
In the Basic tab:
- Choose your Azure Subscription
- Create a Resource Group called e.g. “Anchorpoint”
- Set a Virtual machine name e.g. “AnchorpointVM”
- Select your Region where you want to start the vm
- For “Availability options” select “No infrastucture redundancy required”
- Keep “Security type” as “Trusted …”
- Select “Image” and use e.g. “Ubuntu Server 24.04 LTS - x64 Gen2 …”
- VM architecture keep x64
- Size use minimum “Standard_D2s_v5 - 2 vcpus, 8 GiB memory …”
- use SSH public key
- set a ssh username and generate a key with the default settings
- set “Select inbound ports” to SSH (22) (Do not select 443 here - we will set it up in the Networking tab later)
- click next for the disks tab
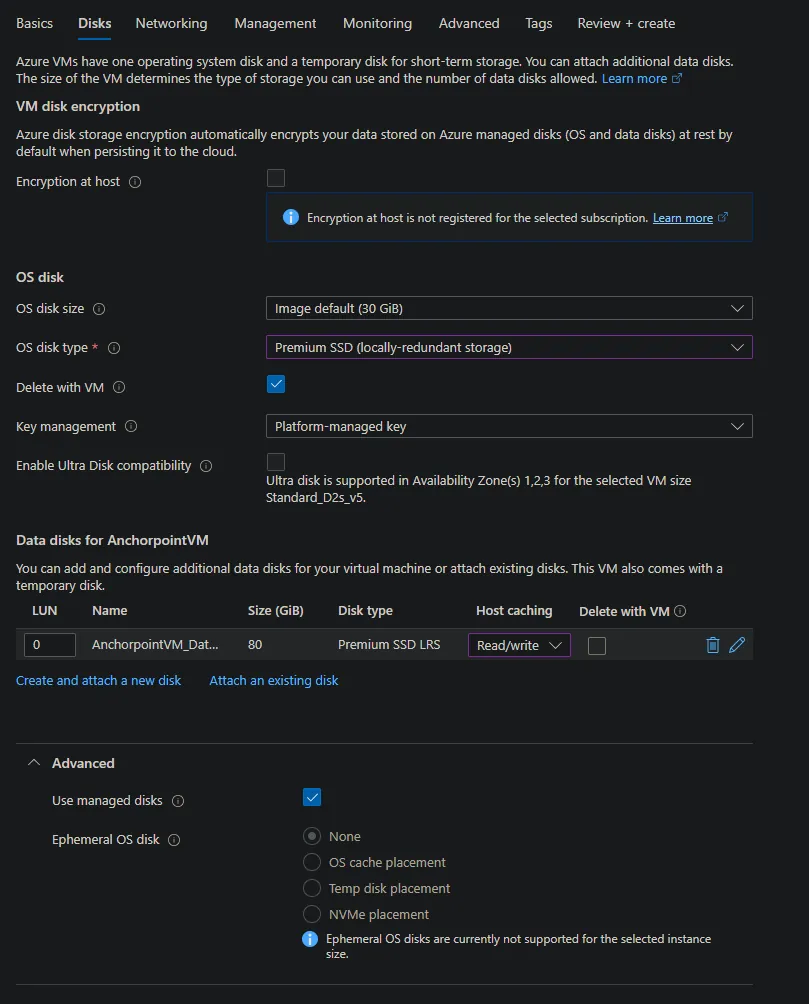
In the Disk tab:
- keep default settings (30 GiB and Premium SSD) disk type
- click “Create and attach a new disk” to create a disk for data
- name e.g. AnchorpointVM_DataDisk_0
- Size 80 GiB with Premium SSD LRS (P10)
- if costs are a concern P6 should also be ok with a size of max 64 GiB
- Do NOT select “Delete disk with VM” to keep the data disk when e.g. updating the VM
- set “Host caching” in disk tab to “Read/write” for new AnchorpointVM_DataDisk_0
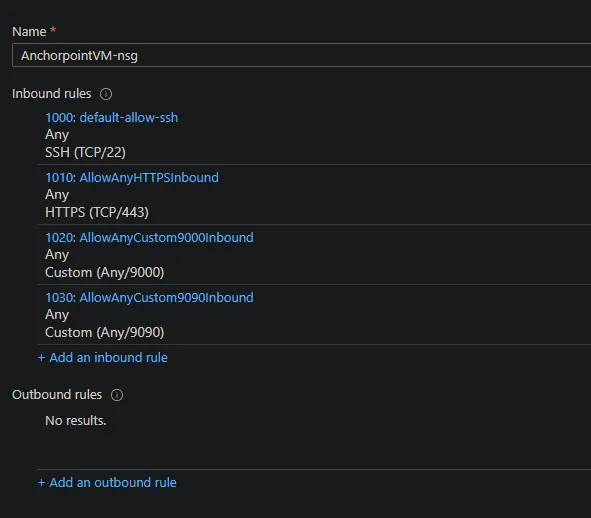
In the networking tab:
- Keep defaults
- Create a new “Public IP” e.g. AnchorpointVM-ip with defaults
- Set “NIC network security group” to “Advanced” and then click “Create new”
- Click “Add an inbound rule” (for https port 443)
- Any, *, Any, HTTPS, Allow, 1010 and Name e.g. AllowAnyHTTPSInbound and click “Save”
- Click “Add an inbound rule” again (for minio on port 9000)
- Any, *, Any, Custom, 9000, Any, Allow, 1020 and Name e.g. AllowAnyCustom9000Inbound
- (Optional) Click “Add an inbound rule” again (for grpc on port 9090)
- Any, *, Any, Custom, 9090, Any, Allow, 1030 and Name e.g. AllowAnyCustom9090Inbound
- Click “Add an inbound rule” (for https port 443)
In the management tab:
- (Optional) Check “Enable backup” and set it up to your needs
Now finish by review and create the vm:
- store the private ssh key by downloading it from the popup dialog
Blobstorage Setup
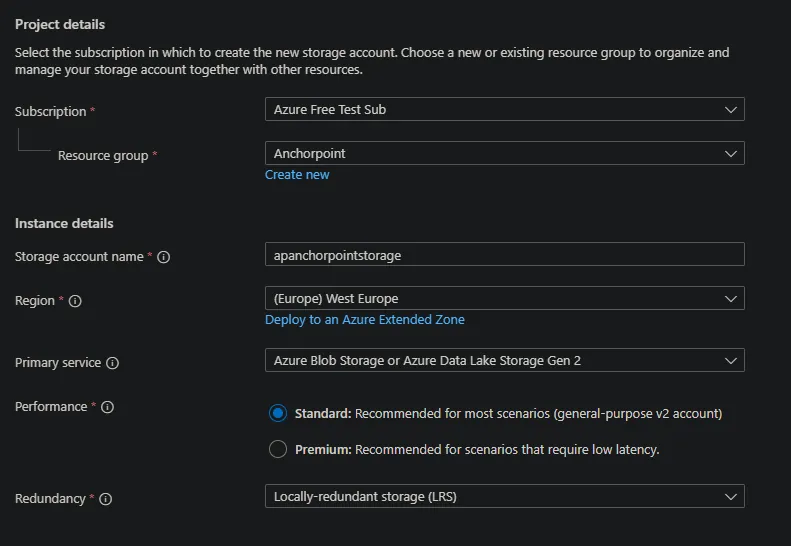
In the azure portal open “Storage Account” and select "Create a storage account".
In the Project Details:
- add it to the “Anchorpoint” resource group
- set a storage name e.g. ap<your_company>storage (note the storage name needs to be unique across all azure blob storages)
- Choose your Region
- Use Redundancy as needed
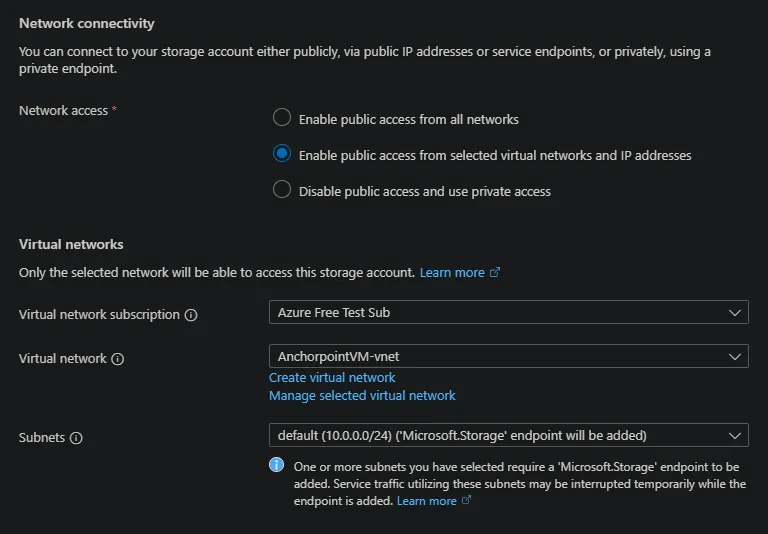
In the networking tab:
- use the virtual network created for the vm instead of public access by choosing “Enable public access from selected virtual networks and IP addresses
Check the other tabs and set the options as needed.
Click “Review and Create” and click “Create” to finish the creation
Go to the created storage account
- open the “Security + networking” / “Access keys” entry
- copy and save the key and connection string for the following BlobFuse2 setup in the vm
Go to “Storage browser”
- Go to “Blob containers”
- click “Add container”
- create a container with name content
- click create
VM Connection
Connect via ssh to your vm (on windows e.g. with putty. You can use puttygen to convert the pem ssh key to a pkk key)
VM Preparation
Mounting the attached drive
Format the attached data disk by first running lsblk to get the name of the drive:
lsblk -o NAME,HCTL,SIZE,MOUNTPOINT | grep -i "sd”
Use the name of the drive (sda in this example) for the following commands:
- sudo parted /dev/sda --script mklabel gpt mkpart xfspart xfs 0% 100%
- sudo mkfs.xfs /dev/sda1
- sudo partprobe /dev/sda1
Mount the drive by creating a folder for the mount. In this example we mount to /datadrive
sudo mkdir /datadrive
sudo mount /dev/sda1 /datadrive
Add the mount to fstab to ensure remount on reboot
First search for the UUID of the drive
sudo blkid
copy the UUID of your drive e.g. 33333333-3b3b-3c3c-3d3d-3e3e3e3e3e3e and open /etc/fstab with e.g. vim to edit it
sudo vim /etc/fstab
add an entry similiar to this (press i for insert mode)
UUID=33333333-3b3b-3c3c-3d3d-3e3e3e3e3e3e /datadrive xfs defaults,nofail 1 2
press escape and save by typing :wq
Mounting the blob storage with BlobFuse2
This section is based on this guide from Azure
Configure the MS package repository
sudo wget https://packages.microsoft.com/config/ubuntu/24.04/packages-microsoft-prod.deb
sudo dpkg -i packages-microsoft-prod.deb
sudo apt-get update
sudo apt-get install libfuse3-dev fuse3
Install BlobFuse2
sudo apt-get install blobfuse2
Create a temporary directory for small cache
mkdir -p /tmp/blobfuse2_cache
Download sample config
wget --no-check-certificate --content-disposition https://raw.githubusercontent.com/Azure/azure-storage-fuse/main/sampleFileCacheConfig.yaml
mv sampleFileCacheConfig.yaml ~/config.yaml
Modify with config.yaml with vim
vim ~/config.yaml
modify with i and adjust similiar to the following example
...
file_cache:
  path: /tmp/blobfuse2_cache
...
azstorage:
  type: block
  account-name: <your storage account name>
  account-key: <your copied storage key from Blobstorage creation>
  mode: key
  container: content
Adjust account-name and account-key to your blob storage created in the previous steps
Mount the directory (Make sure to use -o allow_other to prevent access permission errors)
sudo blobfuse2 mount /mnt/myblob_blobfuse2 --config-file=./config.yaml -o allow_other
Test the blobstorage mount
cd /mnt/myblob_blobfuse2
mkdir test
echo "hello world" > test/blob.txt
check in the azure portal that the file exists in the blob storage
- Go to your storage account
- Open “Networking” and add your IP address to the Firewall
- Open “Storage Browser” / “Blob Containers” / “content” and check that the test folder and the blob.txt file are created remove the test data in the vm
rm -r test
check that the data was deleted in the content blob storage
Install the stack
In the following sections we describe the setup process using our cli tool.
Installing docker
You can install docker e.g. with apt (adjust for your linux distribution accordingly). The latest docker installations ship with docker compose v2 automatically.
sudo apt update
sudo apt install curl apt-transport-https ca-certificates software-properties-common
curl -fsSL https://download.docker.com/linux/ubuntu/gpg | sudo gpg --dearmor -o /usr/share/keyrings/docker-archive-keyring.gpg
echo "deb [arch=$(dpkg --print-architecture) signed-by=/usr/share/keyrings/docker-archive-keyring.gpg] https://download.docker.com/linux/ubuntu $(lsb_release -cs) stable" | sudo tee /etc/apt/sources.list.d/docker.list > /dev/null
sudo apt update
sudo apt install docker-ce -y
Add the current user to the Docker group
sudo usermod -aG docker $USER
newgrp docker
Check if the user was added to the Docker group
groups $USER
To start docker as service automatically run
sudo systemctl enable docker
Setup folder structure
Create a folder on your additional attached disk storage for the data of the Anchorpoint stack. In our example the disk is mounted on /datadrive
mkdir /datadrive/anchorpoint
cd /datadrive/anchorpoint
Cli Tool
Download our cli tool for linux. A documentation of all its commands can be found here. The commands will be used in the following sections.
curl https://s3.eu-central-1.amazonaws.com/releases.anchorpoint.app/SelfHosted/ap-self-hosted-cli/ap-self-hosted-cli-linux-amd64 -o selfhost-cli

chmod +x selfhost-cli
Setup Environment variables before running cli install
You can setup environment variables in your .bash_profile so that you do not have to insert them for every cli command. We will set the install directory and the license key.
cd ~/
touch .bash_profile
vim ~/bash_profile
Add the following lines (press i for insert mode in vim):
export AP_INSTALL_DIR=/datadrive/anchorpoint/install
export AP_LICENSE=<your_license_key_here>
Press escape and save with :wq and call source:
source ~/bash_profile
Check AP_INSTALL_DIR and AP_LICENSE with
echo $AP_INSTALL_DIR
echo $AP_LICENSE
Setup a subdomain
Create a subdomain on your internet service provider
- Set a A Record for your public ip of the azure vm for your subdomain
- You can find the public ip in the overview of your virtual machine in the Azure portal
Installing into the data folder
Create a subfolder in your anchorpoint folder
mkdir /datadrive/anchorpoint/install
Call the selfhost-cli intall command
cd /datadrive/anchorpoint
./selfhost-cli install
- Domain - set the subdomain you created on your internet service provider
- Enable SSL
- Use Let’s Encrypt if your server is publicly available (in our default case it is)
- you can skip the email, because Let’s Encrypt does not send renew certificate emails anymore. We also do not need them, because Traefik will auto renew the SSL certificate
- Use Minio
- Use Postgres
- Choose if you want to install the metrics stack or not
- Continue the Installation
Checkout the self-host guide for more infos about the options.
Configure data paths for the attached disk and blob storage
Open the hidden .env file in the install directory
cd /datadrive/anchorpoint/install
vim .env
Change the folllowing lines (using i for insert mode):
...
MINIO_DATA_PATH=/mnt/myblob_blobfuse2/minio
...
Make sure to create /datadrive/anchorpoint/install/data/grafana before starting and setting permissions since grafana uses custom user in container
mkdir /datadrive/anchorpoint/install/data/grafana
sudo chmod 777 -Rv /datadrive/anchorpoint/install/data/grafana
make sure to create /datadrive/anchorpoint/install/data/prometheus before starting and setting permissions since prometheus uses custom user in container
mkdir /datadrive/anchorpoint/install/data/prometheus
sudo chmod 777 -Rv /datadrive/anchorpoint/install/data/prometheus
make sure to create /datadrive/anchorpoint/install/data/loki before starting and setting permissions since loki uses custom user in container
- mkdir /datadrive/anchorpoint/install/data/loki
- sudo chmod 777 -Rv /datadrive/anchorpoint/install/data/loki
(Optional) How to use your own ssl certificates
If you selected to use your own ssl certificates (self signed also possible) in the stack, you have to place your certificates in the /datadrive/anchorpoint/install/data/traefik/certs directory in your install directory and adjust the /datadrive/anchorpoint/install/data/traefik/dynamic_conf.yaml file in your install dictory to reference all your certificates. An example file content could look like this:
tls:
  certificates:
    - certFile: /data/traefik/certs/cert1.crt
      keyFile: /data/traefik/certs/cert1.key
    - certFile: /data/traefik/certs/cert2.crt
      keyFile: /data/traefik/certs/cert2.key
Note that the path in the config file is the path to the certificates inside the docker container not the path at the host. So keep it as /data/traefik/certs/ in the dynamic_conf.yaml and only adjust the name of the certificate/s and the key/s. Also note that if you have intermediate certificates you have to create one crt file with first the server certificate followed by any intermediate certificates in the same file.
You can also find more information about the dynamic_conf.yaml on the traefik documentation here.
(Optional) How to send emails for user mentions
If you want the Anchorpoint backend to send emails when a user is invited or mentioned in a comment you have to setup the EMAIL_ environment variables for smtp. You can also adjust the email templates from /datadrive/anchorpoint/install/config/ap_backend/templates/email directory.
Start the stack
To start the stack you must use the cli tool start command.
./selfhost-cli start
Internally it will use docker compose up -d but it will also respect configration overwrites. An overview about the state of the containers will be printed. The ap_backend container will only start if the depending containers get into a healthy state. After all containers are started you can check if the Anchorpoint web dashboard is reachable under http{s}://{your_domain}/dashboard. Be aware that it might take a few minutes for the dashboard to be reachable.
Troubleshooting start problems
If the containers do not start, or you cannot reach them via your provided domain or IP address, first check the container log outputs. You can use docker ps -a to view all running containers. Copy the container id and use docker logs {container_id} to print the latest container log outputs.
Also check that your DNS records are setup correctly if you are using a custom domain and that your firewall allows connections on the http / https port, the gprc port, and the MinIO ports.
(Optional) Setup your SSO provider in Keycloak
Checkout our guide for SSO provider in Keycloak here.
Setup user accounts
Checkout our guide for managing users in your self hosted environment here. After you set up the user accounts, login via the Anchorpoint desktop client as described here.
How to update the stack
To update the stack, run the cli tool update command.
./selfhost-cli update
In case an update is available, it will download the latest version of the stack, including the latest Anchorpoint backend and client versions. The update will overwrite files in the installation directory, but will not change anything in your data directories. You can also use the check_update command to check if there is a new version available.
After the update is finsihed you can restart the stack by running the cli start command again. Note that while updating, the Anchorpoint clients will be in the offline mode. We generally recommend updating the stack after work when no users are currently using the application.
How to update your license
Adjust your .bash_profile AP_LICENSE environment variable:
cd ~/
touch .bash_profile
vim ~/bash_profile
ADjust the following line (press i for insert mode in vim):
export AP_LICENSE=<your_license_key_here>
Press escape and save with :wq and call source:
source ~/bash_profile
Check AP_LICENSE contains your new license key with
echo $AP_INSTALL_DIR
echo $AP_LICENSE
You can update the self-hosting license by using the cli tool update_license command.
./selfhost-cli update_license
The command will stop and remove the ap_backend container, patch the .env file LICENSE_KEY environment variable and recreate the ap_backend container for you. Note that this will also result in a short downtime while the ap_backend container is not running. Similar to updating, we recommend updating the license when no users are currently using the application.
How to stop the stack
To stop the stack you can use the cli tool stop command or use docker-compose stop in your installation directory.
Data that should be backed up regularly
You should regularly backup your data in your install directory by e.g. backing up the datadrive disk regularly.